What is media?
Let’s start by reviewing what media is in WordPress, so that we know what we’re talking about in this article.
A website is made up of a multitude of elements that will be displayed by your web browser when you visit it. The most common element is of course text, like the one you’re reading right now. But text alone is not always enough to convey a message, and from the very beginning of the web, media have appeared on html documents.
Media can be many things:
- an image, of course (photo, illustration, diagram, etc.), which can come in a variety of formats. JPEG, PNG and WEBP are the most common formats.
- a video, again in a variety of formats.
- audio: music, interviews, podcasts, etc.
- documents: PDF, text, spreadsheets, compressed files (.zip for example), etc. This last type of media is rarely displayed on a website but can be offered for download.
What is the WordPress media library?
It’s more or less the same as your file explorer, quite simply.
When you click on the ‘My Documents’ folder on your computer, you see a whole bunch of documents (logically).
When you upload a file to your WordPress site, it lands in the /wp-content/uploads folder. WordPress will create sub-folders for each year and month in order to find its way around.
Except that in practice, when you’re managing a website, and even when you’re managing your family photos, this kind of classification isn’t very practical.
The basic WordPress media library will therefore display everything, by default in reverse chronological order (so the most recent media first).
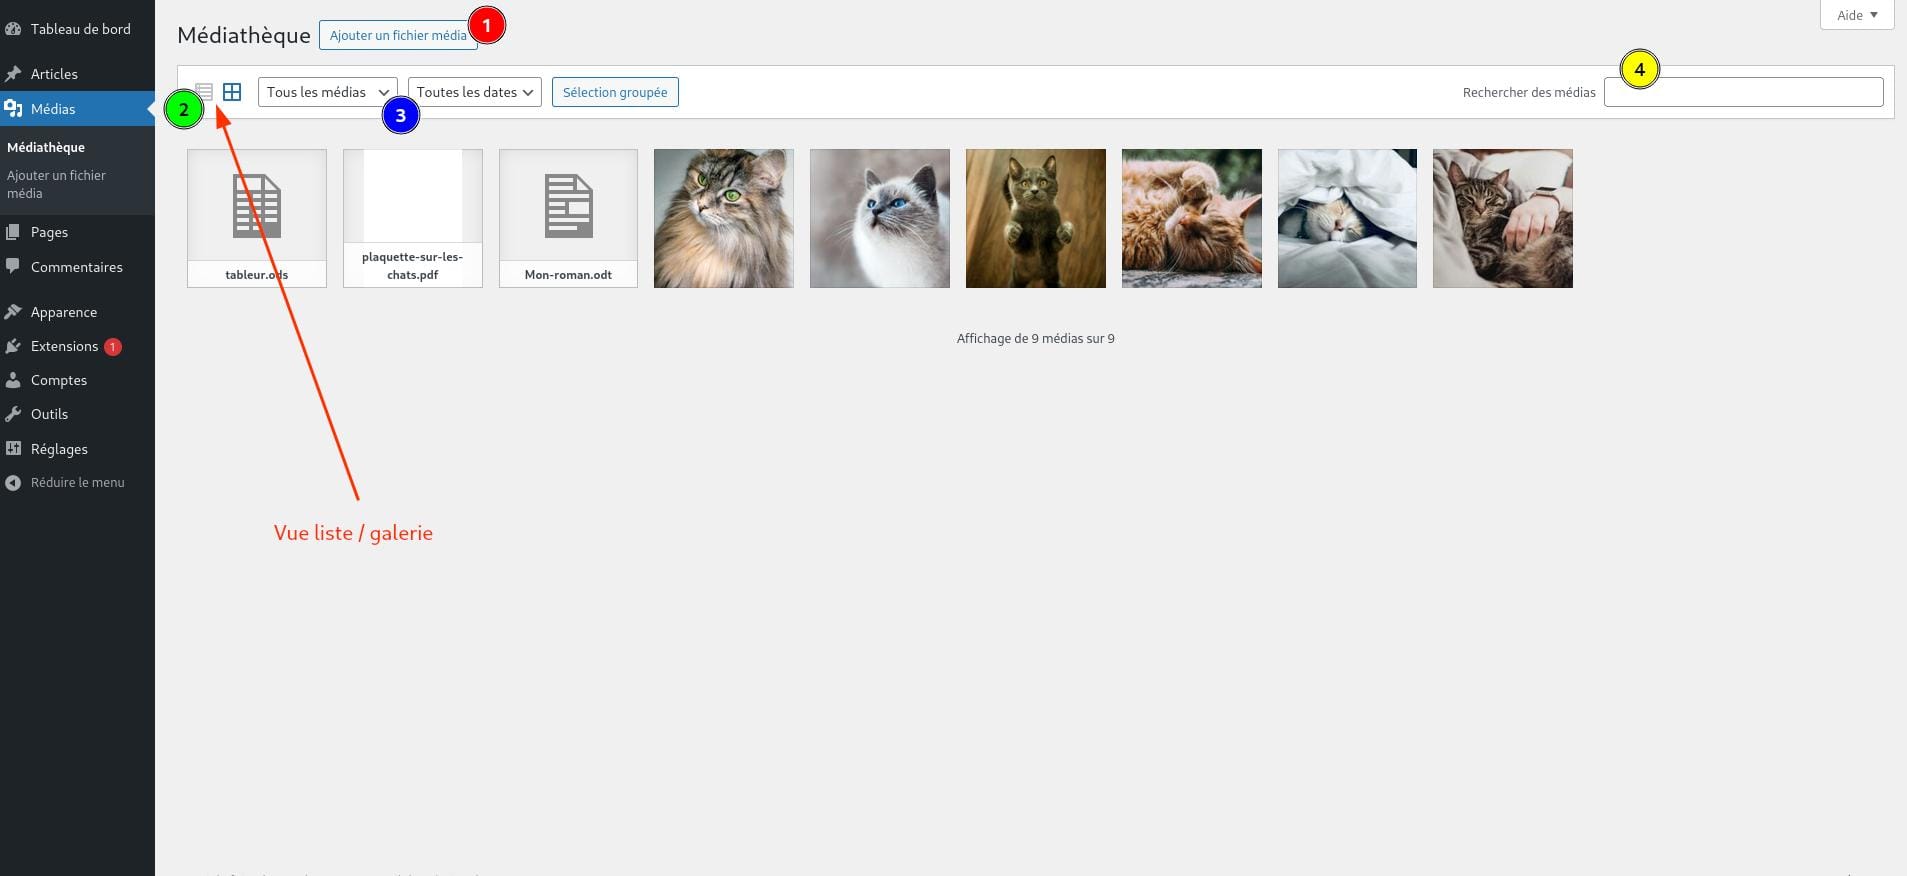
The basic WordPress media library allows you to:
- Add files from your computer
- Display media in a grid or list
- Filter files by type or date
- Search by name (like your computer’s file explorer)
Mistake no. 1: Confusing WordPress with an online storage space
This is an easy mistake to make, especially with the ubiquity of cloud services in our daily lives.
Sort it out beforehand
You need to write an article for your site, and you’ve got a bunch of images that could be useful. Rather than deciding in advance which files you’re actually going to include in your article, you decide to click and drag the entire folder from your computer into the media library, thinking that way you’ll have everything to hand when the time comes.
The problem with this approach is:
- You think you’re saving time but you’re actually wasting it (and you also often make mistake No. 2).
- You overload your website server for nothing
- You turn your media library into an unmanageable hodgepodge.
- You won’t dare sort through it afterwards and delete unused files, because you won’t be sure⋅e what media you’ve used on the site.
In short, take the time to choose the files you want to use on your computer. And if you realise after inserting a piece of media that you don’t actually need it, delete it from the media library rather than letting it take up space for nothing.
Serve the file locally or via a third-party service?
You should also ask yourself the following question: does it make sense to store your media in the WordPress media library rather than serving it via a third-party service?
What I mean by this is that in certain situations it’s better not to create unnecessary duplication.
If you want to offer a video or podcast for playback on your site, and they already exist on the Internet on another platform (typically Youtube or Spotify), it may be wiser to integrate them on your page rather than serve them from your website.
What’s more, these media are generally quite heavy and can quickly take up a lot of bandwidth. It is also important to generate several display formats to adapt to screen resolution (as with images).

For all these reasons, we generally prefer to play a video from a streaming service. Youtube and Vimeo come to mind, of course, but you can also use other less invasive services (using Youtube or Vimeo requires user⋅trice consent). For example Bunny Stream to serve your videos. It’s efficient, GDPR-compliant and cost-effective.
In any case, if you choose to insert remote media, only do so if you have the right to do so. For example, inserting images from other sites in this way without authorisation is called inline linking and is a very serious offence.
Mistake no. 2: Not renaming your files
It may seem like a simple piece of advice, but it’s one that’s rarely applied.
A lot of media (photos in particular) have been taken with a camera or smartphone, or have been downloaded from online image banks.
In all cases, the initial file name is incomprehensible and looks something like IMG_20240731_205636.jpg.
You need to take the time to rename your files.
The advantages of having files with appropriate names
A file with a meaningful name will:
- Help you find it more easily later when you do a search (remember the media library search tool I told you about?).
- Help you to see for a moment what this file is used for on your site if you opt for a name related to its use, for example ‘produit_jardinage_brouette-acier-01.jpg’.
- Make life easier for your users⋅trices if the media is to be downloaded
- Give your SEO a boost by using a file name that helps robots better understand what it contains
How do you go about it manually?
If you only have a few files, it’s easy enough to do it by hand.
Use the context menu with the right mouse button, or press F2 (or the Enter key on the Mac) once the file is selected to rename it.
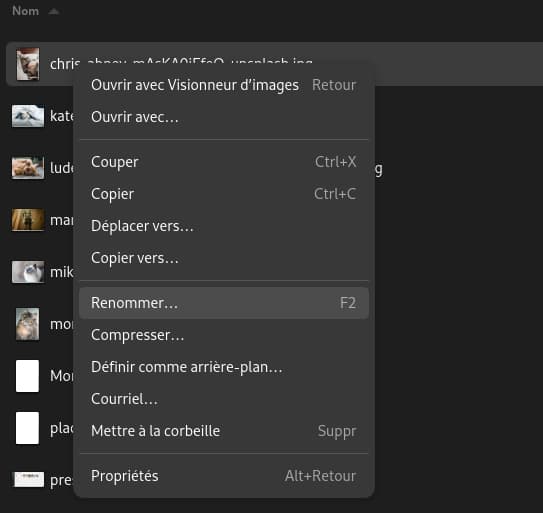
Keep your file name short. It is not a description.
Automate file renaming
Let’s imagine that you need to import around twenty files for a product sheet or an article on a given theme.
Ideally you would like your files to be called product_gardening-rateau-01.jpg, product_gardening-rateau-02.jpg, product_gardening-rateau-03.jpg, …, product_gardening-rateau-20.jpg.
You don⋅t have to waste 10 minutes of your life renaming your files. Use batch processing software to do the job in less than a minute for you.
For example, I recommend XnviewMP which is free for personal use and is available on Linux, Mac and Windows.
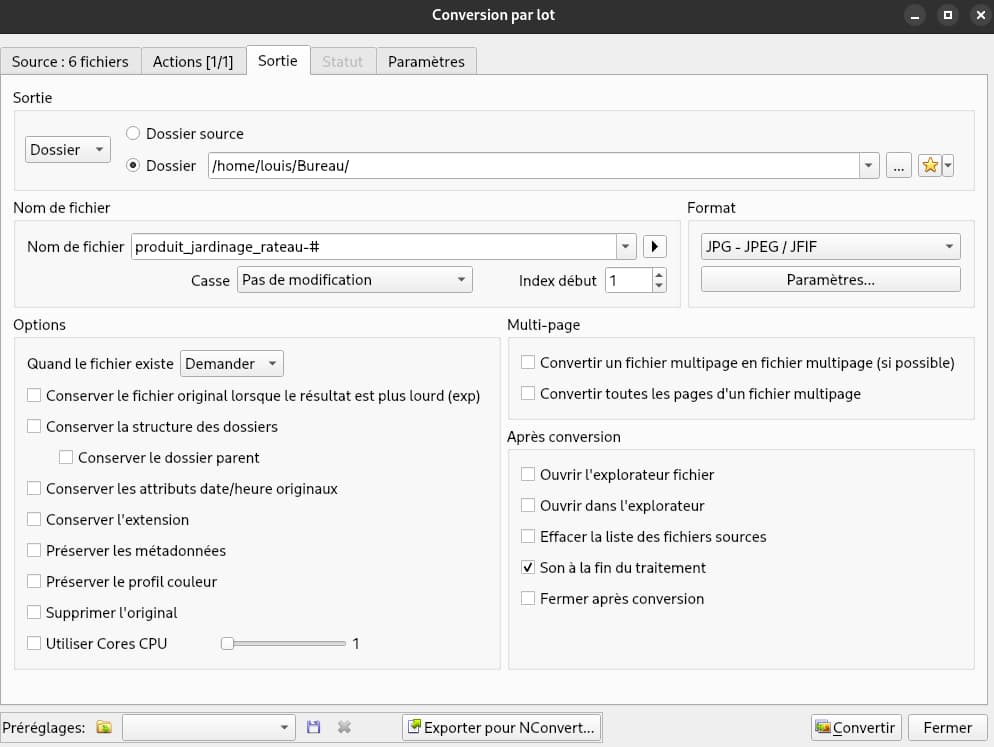
You can download it from the official Xnview website.
Mistake no. 3: not preparing your media before importing
This is the mistake that comes to mind first. Preparing your files involves three important aspects.
The resolution or weight of the file
WordPress will automatically resize images whose resolution is too high. By default, the CMS will limit the largest dimension of your image to 2560px.
Your image will also be recreated in different sizes, before being served the one best suited to the terminal displaying your website. This allows you to choose a lighter variant when the site is viewed from a smartphone.
Great, so nothing to do?
Well, not quite.
Uploading files at the right resolution from the outset limits the load on the server, and saves you time.
What’s more, there’s no point in uploading high-resolution images if they’re not going to be displayed at full width.
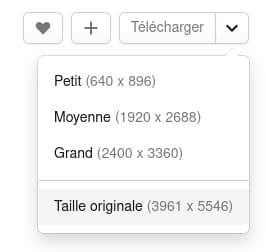
As mentioned above, you can quickly process your images in batches using software on your computer (avoid online tools, as the whole point of doing this is to limit the amount of data you send online).
Choosing the right format
Some media are initially generated or downloaded in a high-quality format. This is very useful, for example, for printing images or enlarging them, or for viewing videos or audio in high quality.
For web use, it is essential to reduce the weight of the media as much as possible so as not to slow down your site.
The classics: JPEG and PNG
For images, we generally prefer the JPEG format, which allows lossy compression to a level that is imperceptible to the naked eye. Let me reassure you: jpg and jpeg are the same thing.
This is often the basic format generated when you take photos with your camera.
For some photos or illustrations, you’ll need to add a layer to manage transparency. This is where the PNG format becomes interesting. It has the disadvantage of being generally heavier than JPEG because of its better quality.
To convert your files into the right format, I again recommend using software on your computer rather than sending all your files online, for reasons of the environmental impact of digital technology, but also for reasons of efficiency.
A lot of software will allow you to batch process your images, and in a few clicks convert them to the right format, with the desired compression ratio, resize them and rename them, such as XnView MP which I mentioned earlier.
If you prefer to use SaaS, try Squoosh or TinyPNG which give pretty good results.
New formats: WEBP and AVIF
Over the last few years, WEBP has become a benchmark format for the web, combining the transparency of PNG with the lightness of JPEG. With 97% compatibility at the time of writing, it can now be found everywhere.
The AVIF format is also booming, with 94% compatibility.
These formats offer significant gains in file size (often in excess of 50%).
In general, the original format (PNG or JPEG) is retained and conversion to WEBP (or AVIF) is carried out on the web server. The advantage is that the original format can be served to older web browsers. But it’s also a pragmatic choice. Few people convert their images into these new formats before uploading them to their site (you may not even have known that these formats existed before reading this article!)
For all my clients, I set up an automated image conversion and replacement system via Litespeed, to ensure good performance and simplify their task.
The special case of SVG
I’ll finish with SVG, or vector format. It is mainly used for icons, but also for illustrations and logos. It is a very lightweight format that is not rasterised, unlike the other formats mentioned above.
In simple terms, this means that the image can be enlarged infinitely without loss, as it is constructed according to mathematical formulae.
This format is not suitable for photos and complex illustrations.
It is also a format that can pose security risks because malicious code can be introduced. Hence the importance of disinfecting the file on import and not allowing just anyone to import images in this format.
In short, this is a format that will be used mainly by designers and developers.
Crop and retouch your images
The WordPress media library allows you to crop and resize images that have already been imported.
But it’s best to make these adjustments beforehand on your computer, for practical reasons and because the possibilities in WordPress are fairly limited.
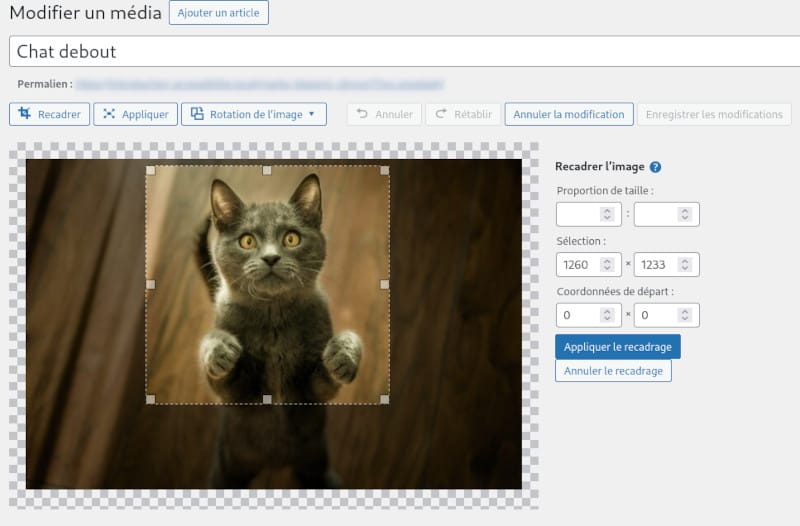
Sometimes it’s also necessary to adjust the colour balance.
A good crop helps to highlight a subject in a photo. It’s also sometimes a good idea to choose a different framing for different screen sizes (for example, offering a landscape photo on a computer but refocusing the photo on the subject for display on a mobile phone).
Carry out these operations using your photo editing software. If you’re looking for a free, open-source tool, Gimp is a very interesting alternative to Photoshop, but it can be complex for basic needs.
Mistake no. 4: Failing to fill in the media meta fields
This is probably the most forgotten and neglected step of all.
Perhaps because few people know the purpose of all these information fields that appear once a piece of media has been added to the media library.
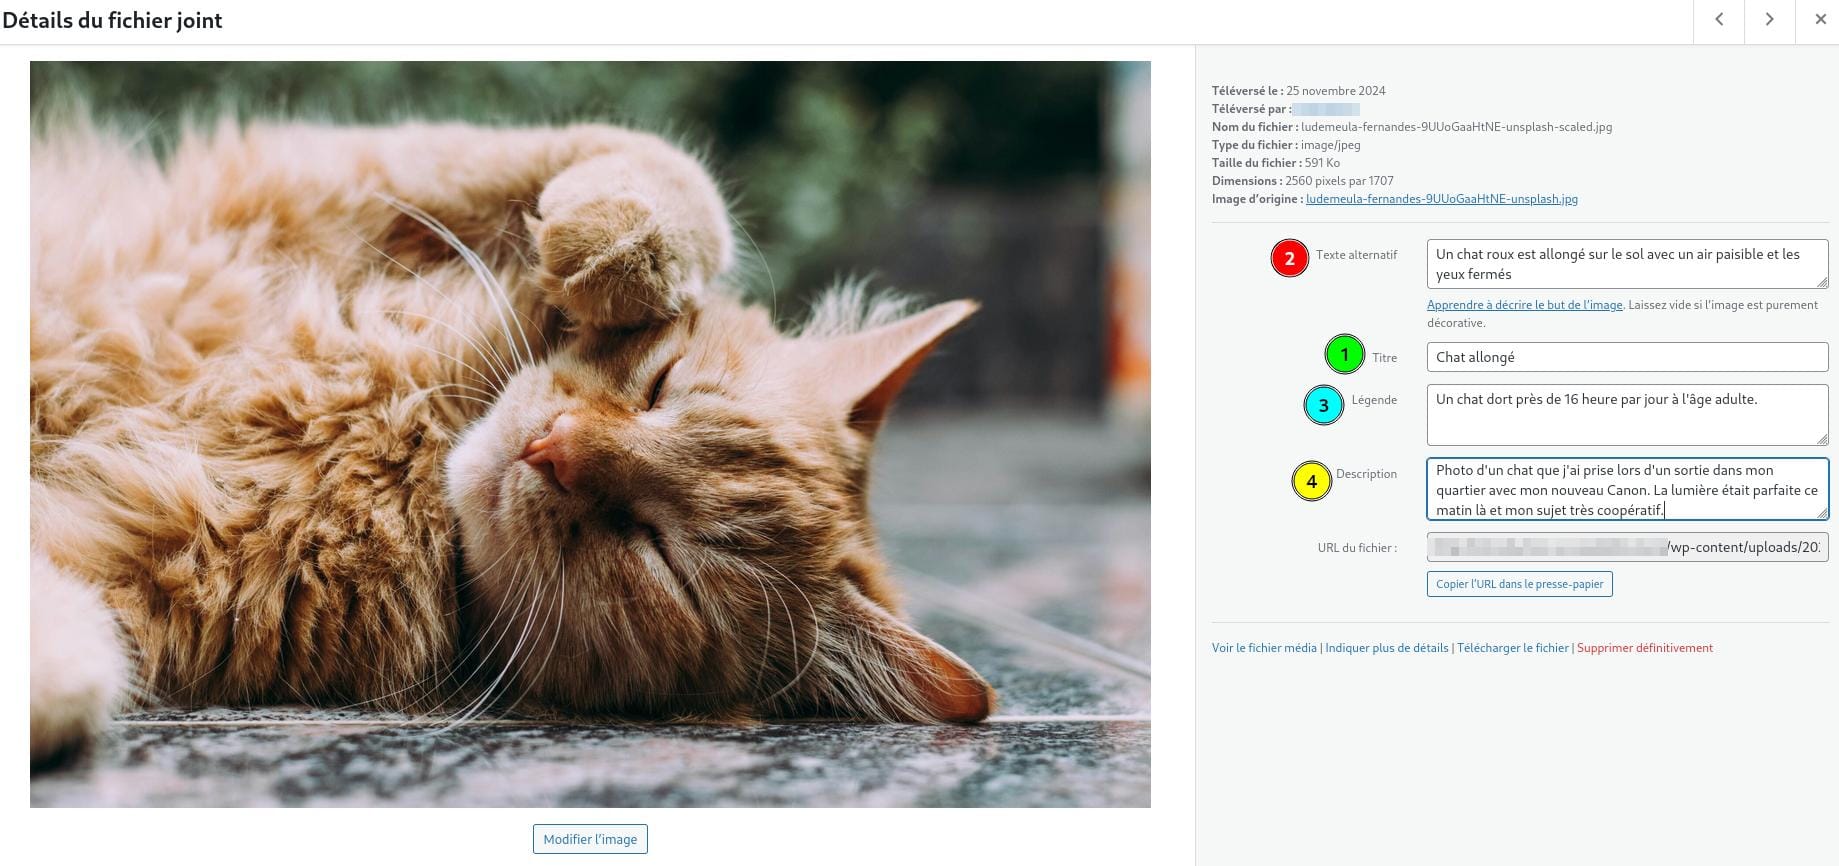
The title
By default, when you import your file, the title saved will be that of your file (without its extension).
Therefore, if you have already renamed your files correctly, the title should make sense.
The title is particularly useful for helping you to find a file later in your media library by searching by name. But it is also the main title that will be used if the image is attached to a page (see description below).
The alt text
This is perhaps the most important element to consider.
The alt text is an alternative text that will be displayed if the image is not displayed on the screen. But above all, it’s the text that will be read by screen readers and crawlers on your site.
In other words, people who rely on visual assistance technologies need to hear the alt text of your image to understand what it’s about.
And the search engine spiders that visit your site to rank you will also be interested in your media. The robots don’t ‘see’ the images, but they can read the alt text.
The rules for writing alt text would require a full article, but just remember this for now: your alt text must be concise and descriptive. If your media is used purely for decorative purposes and has no other interest, leave the alt text empty so as not to make it difficult for people using a screen reader to read your site.
The caption
This is the text that appears under your images when you insert them.
You can of course choose not to display a caption, and can modify it on a case-by-case basis if you use the image in several places. By entering it in the media library, you can generate it immediately when you insert your image in your article.
The description
This is probably the least understood and least useful field.
In fact, when you insert media into your media library, WordPress will potentially attach it to a given page. For example, if you start writing a blog post, and insert your images from there, WordPress will understand that your images are linked to this post.
It will then be possible to activate the display of these images by clicking on them as an element of this attached page. The description field will then be displayed.
This is a feature that can make sense for photographers’ portfolios, for example, where it makes sense to focus on the images and therefore provide more detailed descriptions by viewing them.
For more standard use, don’t worry if you don’t fill in this field.
Note that it is possible to write html in this field (as well as in the caption field), which can be useful for making links, for example.
Mistake no. 5: Turning your media library into a bazaar
This is undoubtedly one of the biggest weaknesses of the basic WordPress media library. You can’t sort your media into folders and subfolders like you can on your computer.
This isn’t a problem if you only have a few files, but it can quickly become a nightmare if you manage a large number of documents, and you haven’t adopted a precise terminology for titles.
Extensions exist to remedy this problem.
All the sites I build for my clients benefit from the HappyFiles Pro extension with a lifetime licence.
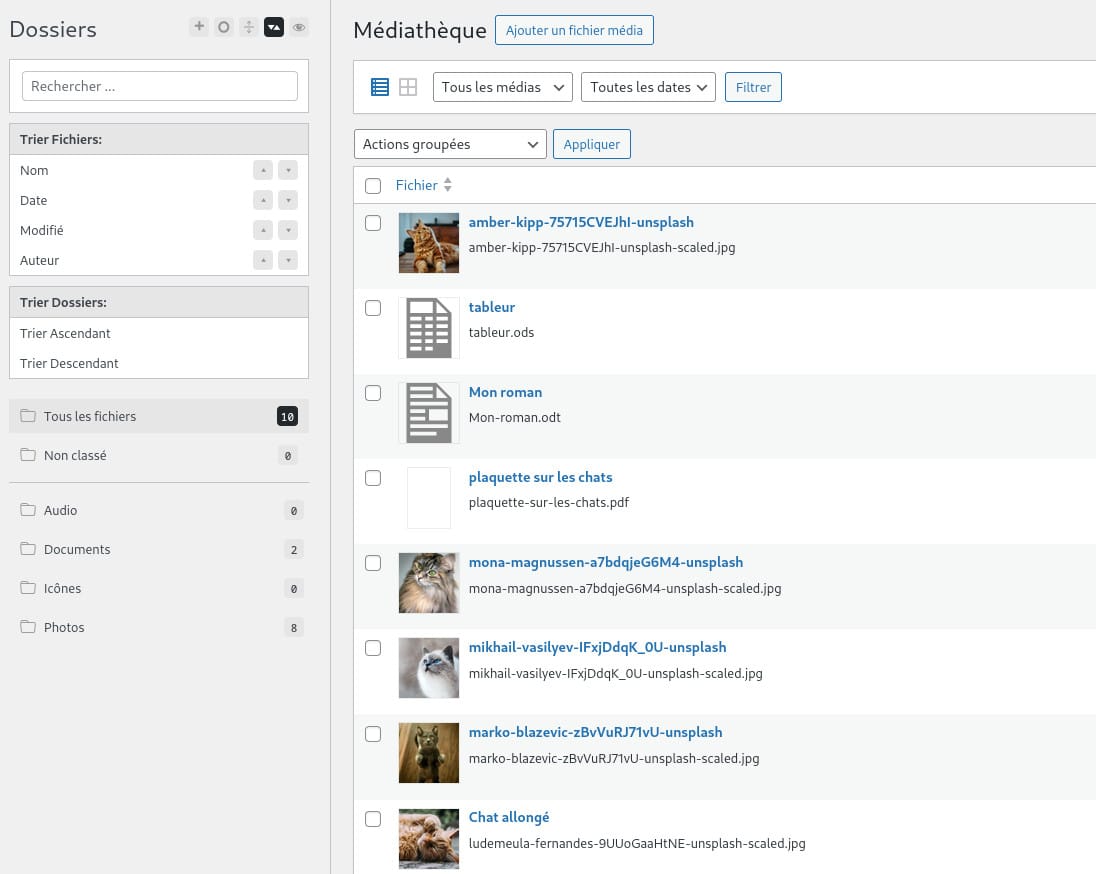
This extension allows you to organise more than just your media, as it can be used to organise your blog posts, pages, etc.
In short, an undeniable asset that will transform the way you manage your media in WordPress.
What you need to remember to manage your media well in WordPress
This complete guide has given you the advice you need to follow to improve efficiency, performance and accessibility when adding media to your media library.
Here is a summary of the most important points to remember:
- Ask yourself which media will really be useful on your site, and if they can’t be integrated from a streaming platform in the case of video and audio.
- Give your files a logical name before importing them
- Optimise your images as much as possible before importing them, by choosing the right resolution and format. Crop them if necessary.
- Fill in at least the title and alt text of your images. Leave the alt text empty for icons and other purely decorative media.
- Organise your media library as you go along, using a tool like Happyfiles Pro.
I hope this guide will help you to see things more clearly and to correct certain habits. Even if you don’t follow these guidelines 100%, you’ll see that taking a little more time to put them into practice will make your life much easier and improve the experience of your users⋅trices.
If you’re feeling overwhelmed⋅e or don’t have the time to follow these best practices when creating your content, get some help. I offer outsourcing + webmastering packages tailored to your needs that include uploading, formatting and optimising your articles and web content.


